Showing posts with label Blogspot. Show all posts

Saturday

How To Add Whatsapp Share Button In Blogger

Posted By: Arin Dey - June 27, 2015
Blogger has been one of the most favorite blogging platform since ages where you get the opportunity to promote your content and you can share your posts via many social networks. In 2009, WhatsApp was launched. That time no one predicted that someday it would challenge the popularity graph of Facebook. In the year 2013, WhatsApp was declared as the most used social network, leaving Facebook behind. Today in this article, we will show you how to add whatsapp share button in blogger.

How To Add Whatsapp Share Button In Blogger
WhatsApp has made its position over social sharing platform by increasing popularity. Google's blogger now provides you the opportunity to add WhatsApp share button to your blog. You will find a lot articles on how to add various widgets in the blogger blog in this website. Now you will know about adding WhatsApp widget.

Why should you add WhatsApp button ?

With the increased use of mobile phones nowadays, it is necessary for you to make the best use of your phone by optimizing it and enabling it so share sites, writing content or anything you liked and want to share with your friends and connections.

During its introduction days, WhatsApp was only a mobile feature but its increasing fame led to its availability on web as well. Imagine about the leverage you can get if one of your subscribers like any article on your blog and he shares it via WhatsApp to others. Here more people will view that shared article and at the end your website traffic will boost.

Steps To Add Whatsapp Share button in Blogger:

Before you add WhatsApp share button to blogger, you have to know its position over the page. It is recommended to add such traffic boosting widgets at the end of your article instead of putting them to the side bar running along the entire length of your blog page.

Below is the graph which shows WhatsApp versus other social networks.

How To Add Whatsapp Share Button In Blogger


You can add WhatsApp share button with the help of following steps:


1. Move your mouse pointer and go to Template 
2. Click on Edit HTML. 
3.  Add the following code with you previous share buttons.

<!-- Whatsapp Share Buttons Start -->
<script type='text/javascript'>if(typeof wabtn4fg===&quot;undefined&quot;){wabtn4fg=1;h=document.head||document.getElementsByTagName(&quot;head&quot;)[0],s=document.createElement(&quot;script&quot;);s.type=&quot;text/javascript&quot;;
s.src=&quot;https://googledrive.com/host/0BwMMDqbfGy7Od3UtLTRJcncwQ1U&quot;;h.appendChild(s);}</script>
<a class='wa_btn wa_btn_s' expr:data-href='data:post.url' expr:data-text='data:post.title' href='whatsapp://send' style='display:none'>Share</a>
<!-- Whatsapp Share Buttons End -->

4. Now get a preview your template before save it.

Note : The above code will give a small WhatsApp button to your Blogger blog if you want to add a medium or large button change the code in red with wa_btn_m (for medium WhatsApp button) or wa_btn_l (for large WhatsApp button). 

If you followed the steps properly, you could preview the blog and have to save the changes to the template by pressing the “Save template” button.

You have added the WhatsApp sharing button. Please comment on this article and also make your first move by sharing this article via WhatsApp and on other social media.

How To Backup Your Blogger Blog And Template

Posted By: Arin Dey - August 30, 2014
Bloggers who have blogs on Google's Blogspot platform used to complain regarding backup option. They couldn't backup their blogs from blogger platform directly. Only option was a third party tool. Now Blogger has inbuilt "Import & Export" feature that can be accessed from the Settings tab of your Blogger dashboard.

Follow the simple steps to get there :
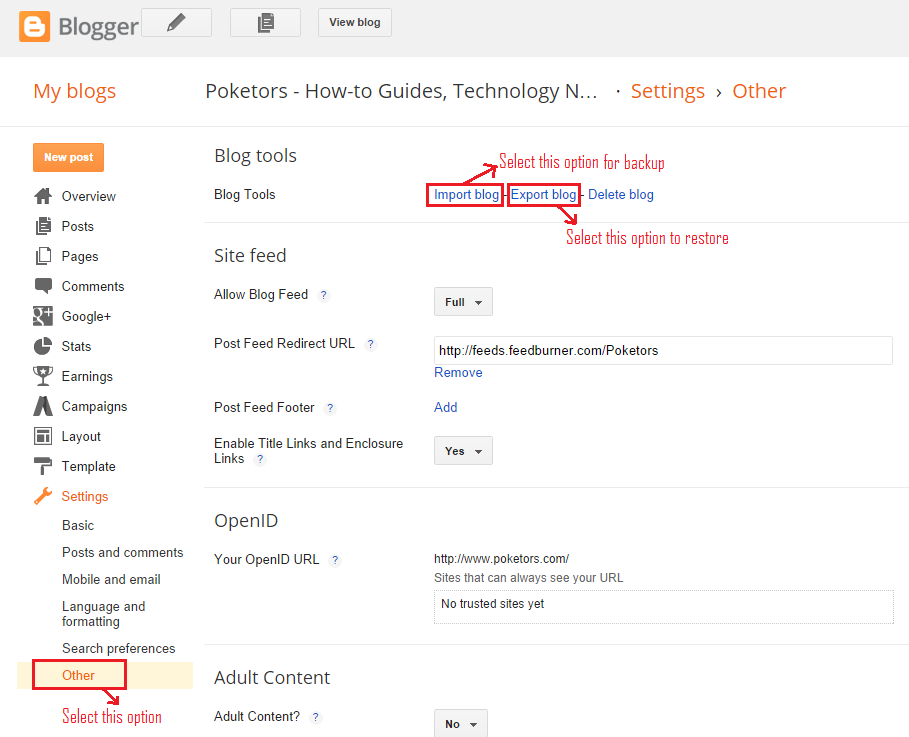
1. Go to "Settings" tab and under that there is an option called "Other". 
2. Click on "Other" and you could see Blog tools there.
3. Under Blog tools there are three options Import/Export/Delete Blog.  

Now imagine a situation where you accidentally delete some old blog post or your blog is blocked by Google due to policy violations or hacked. In these cases, at least you will have a local copy or backup of your content which can be available for restoration.

Steps - How to Backup your Blogger Blog with Posts and Comments

1. Go to Blogger dashboard and select Settings 
2. Select the option Other
2. Under Blog tools, click on “Export Blog”

Once you click on the link and it will download a copy of your blog with blog posts and comments to the hard disk in Atom (XML) format. Click on "Import Blog" in case you want to restore from any saved xml file. Check the image below.  

How To Backup Your Blogger Blog And Template


It is always recommended to save a copy of your Blogger template also known as Theme. In case your template gets corrupt, you can restore.  The XML file created by Blogger is not compatible with external blogging platform other than blogger.

Steps - How to Backup your Blog Template

1. Select Template in your Blogger Dashboard 
2. Click on the Backup/Restore button at the top right corner.
3. Choose the hard drive location where you want to save the template.

This will again download the full template in XML format.

How to Backup your Blog Template

Restoration : You can restore any saved template from the same option "Backup/Restore".

Hope the simple steps help you to backup your blog and templates quickly. 

How To Add 125x125 Ad Slot To Your Blogger / Blogspot Blog

Posted By: Poketors - August 31, 2013
Sometimes bloggers wish to show their ads in small boxes instead of putting a large box of (300x250) which will occupy more space on your home page and will show only one ad. If you put four small boxes instead of the one large then you have the option to put 4 different ads. This can be done via CSS also but we have shown here a very easy way adding via HTML codes. Lets see how it works. here are the steps do it.
Step 1 : Go to Blogger Dashboard and click on "Layout" section. 

Step 2 : Now click on "Add a Gadget" -> select it as "HTML/JavaScript". Copy paste the below code.
<center><table border="0"><tr>
<th width="126" height="126" align="center"><img src="http://example.com/ad-1.jpg"/></th>
<th width="126" height="126" align="center"><img src="http://example.com/ad-2.jpg"/></th>
</tr><tr>
<td width="126" height="126" align="center"><img src="http://example.com/ad-3.jpg"/></td>
<td width="126" height="126" align="center"><img src="http://example.com/ad-4.jpg"/></td>
</tr></table></center>
Note : Here the code with "<th.." is used for columns (here two columns) and  the code with "<td.." is used for rows (here two rows).

Step 3 : Replace the example image URL with your advertiser image URL or affiliate marketers image URL.

Step 4 : Put 3 Ads space with your affiliates ads and keep one space showing "Advertise Here" for new advertiser so that advertiser can come to your blog with offers for their ads.

It is always advisable that we should keep at least one box for new advertisers because depending on your niche some advertisers may approach you with their ads and you can provide them the quote for your page space and location. So fix a price for ad slots available in your site and share the rates with advertisers.

Tuesday

How To Remove Default Comment Box From Blogger / Blogspot

Posted By: Poketors - August 13, 2013
Blogger or Blogspot has been always the first choice when someone decides to start up a new blog.  In blogger templates we have default comment box and it comes in each and every post page below the post body. Here the main issue with comment box is that while the readers reading the post can comment anything. 

How To Remove Default Comment Box From Blogger / Blogspot

As this is an open box and anyone can put comments, sometimes it leads to spams which is not possible to monitor and delete in regular basis. As an alternative bloggers use comment box from different sources, like most of us. use Disqus. The main advantage here is that you get all the comments to your Disqus account directly and you have the option to hide or remove any comment before it comes to your post page. So you can remove any comment which you don't think as relevant to the post.

Here is an easy way to remove or hide the default comment box from post pages in blogger. For this, no need to remove any code from blogger template. 

Follow the below mentioned steps and hide it permanently.

1. Go to Blogger Dashboard

2. Edit Template

3. Now search for the following CSS code :
]]></b:skin> 
4. Just before the above CSS part add the below code 
#comments {
display: none!important;
}
Remove Default Comment Box From Blogger / Blogspot

5. Save you template and open your blog pages.

Note : In case, you want the comment box back to post pages, just remove the added code again.

Wednesday

How To Add "Thumbs Up" Rating Widget to Blogger

Posted By: Poketors - February 01, 2012
Star ratings are very common in use but recently we found JS kit that is having either using with a star rating look or setting it to "Thumbs Up!" Total number of thumbs up or thumbs down for each of your posts can be calculated and shown. We would recommend that you add it to your blogs to engage your readers more and increase your overall page views. Viewers for your blog would love to explore articles on your blog using this widget effectively.
How To Add "Thumbs Up" Rating Widget to Blogger
Image Credit : Google
Follow the 7 steps to add Thumbs Up Rating Widget  to your blog:

1. Open particular Blog under Blogger 
2. Click on Edit HTML (Before that take a back up of your template)
3. Now search for
<data:post.body/>
4. Above the searched string, paste the code below:
<b:if cond='data:blog.pageType == &quot;item&quot;'>
<div class='js-kit-rating' expr:path='data:post.url' expr:permalink='data:post.url' expr:title='data:post.title' view='score'>
</div>
</b:if>
In this way you can add Thumbs up widget just below your post titles. This widget will display only at post pages and not on homepage. If you wish to display it on homepage then simply delete the bolded lines. If you would instead like to add the Star ratings look/skin then simply delete view='score'.

5. Now search for
</body>
6. Above the searched string, paste the following code:
<script src="http://js-kit.com/ratings.js"></script>
7. Now save your template and all done!

Now users can visit any of your post and click the ratings to either Thumbs Up and Thumbs down the post.

Monday

How To Remove Navbar In Blogger / Blogspot

Posted By: Arin Dey - September 26, 2011
In Blogger we find the top navbar occupying some space from top of the page with no use at all. Most of the bloggers don't like navbar to be shown in the page. They always want to remove from their blog. You can also remove it by following the below mentioned simple steps.

How To Remove Navbar In Blogger
Let us know about the Navbar first and what feature we get from it. 

The navbar is used :

1. to search in the blog 

2. to go to random chosen blog 

3. to mark the blog as spam 

Now you don’t want this navbar to appear on your blog anymore. So just login in your blogger account and do the following:

1.Go to Dashboard -> Template (As per new Blogger interface)
2. Edit HTML,
3. Put the below code somewhere just before the </HEAD> tag: 

#navbar-iframe {
display: none !important;
}
Well. You have just now removed the navbar.

Friday

How To Add Digg Button To Blogger / Blogspot

Posted By: Arin Dey - September 23, 2011
One of the widely used social networking site is Digg. It offers button which can be included to your blogs, which is really useful for showing the visibility of your blog among the search engines.

You can use a ‘submit to Digg’ button on your site which will definitely increases the post shares by one of your viewers and publicize to their network. 

In this post you will find the step-by-step guide for including the Digg count button to every single blogger post. Digg button will show a better chance your post will be digged and get you more web traffic. You can also know how to add Digg button on top or bottom of each post and the alignment of Digg button on left or right side of posts.

How to add Digg button to every Blogger/Blogspot post ?

Adding Digg button to each post on your blogger blog you must copy and paste the following code in blogger template:
<script type='text/javascript'>
digg_url = '<data:post.url/>';
</script>
<script src='http://digg.com/tools/diggthis.js' type='text/javascript'/>
By following some simple steps you can easily add Digg button before every post or on the bottom of every post.
You can edit HTML and search for <data:post.body/> and paste the code just before if you want to display the Digg button on the top of the post or after the code in case displaying bottom of the post.
Find the step by step guide to add Digg button counter to blogger

1.  Go to Blogger.com dashboard.

2. Go to Layout section

3. Click on Edit HTML -> Proceed

Note : Always take a backup template on local hard disk before doing any change in edit template box 

4. Check on Expand Widget Template


5. Search for
 <data:post.body/>
Alignments :

Centre Alignment:
1. Digg button counter on the top of post. Include Digg button code (code above) before <data:post.body/>...
[DIGG BUTTON CODE]
<data:post.body/>...2. Digg button counter on the end of your posts, add Digg button code just after <data:post.body/> ...
<data:post.body/>[DIGG BUTTON CODE]...
Left Alignment To align your Digg button left use this code: 
<div style='padding: 4px; float: left;'>
[DIGG BUTTON CODE]
</div>
Right Alignment : To align your Digg button counter right: 
<div style='padding: 4px; float: right;'>
[DIGG BUTTON CODE]
</div>
Here is the sample code for Digg button before each post on left side: 
<div style='padding: 4px; float: left;'>
<script type='text/javascript'>
digg_url = '<data:post.url/>';
</script>
<script src='http://digg.com/tools/diggthis.js' type='text/javascript'/>
</div>
<data:post.body/>
Hope you have added Digg button to your blog successfully.

Monday

How To Migrate From Blogger to WordPress

Posted By: Arin Dey - September 19, 2011
When it comes to SEO implementation on your blog, we can't say that blogger is the best blogging platform. Blogger can be an option for spammer to create dummy pages for marketing purpose and also it has multiple limitations associated with it.  Blogger is staying behind the CMS (Content Management System) because it doesn't have that much support-ability of expert level compared WordPress for CMS on web.

Hence we have to acknowledge that WordPress is the best, most used and popular CMS. WordPress won several best CMS awards also. It is much more secured than Google's blogger. These are some reasons for which people are shifting their blogs from Blogger to WordPress because WordPress offers great support from the community. The main advantage using WordPress is that it offers lots of plugins to manage your blog and WordPress is therefor considered as the pioneer in the Blog-sphere.

How To Migrate From Blogger to WordPress
The first question comes here is that how you can transfer your Blogger blogs to WordPress? No worries. The answer is very simple. We will be guiding you explaining step by step process so that you can easily migrate or import your Blogger blogs to a WordPress. You will do it without any issues. 

Here are the steps to move from Blogger to WordPress

1. What to do with Blogger blogs ? (Assuming that you are using latest Blogger interface)

a) Log in to your Blogger account 

b) From Dashboard go to Settings -> Others .

c) Here you will find the option Blog Tools 

d) Blog Tools has three options :  Import Blog, Export Blog & Delete Blog 

e) Now click on Export Blog Link. You will get a box like the below figure.

f) This option is used to transfer the current blog to another Blog URL 


g) Now click on “Download Blog” button, it will ask you to save an .xml file with the current backup of the blog. 

In a summarized way we can say: Login into BlogSpot Blog> Settings > Others > Blog Tools > Click on Export Blog> Download .xml file.


2. What to do in WordPress Blog ?

a) Log in to WordPress Blog
b) From Dashboard go to Tools Section
c) Check for the option Import. Now click on this option.
d) Import Option will give you the number of options. From them, you have to select only the first option, i.e., Blogger) Now click on Blogger where it displays the message like below:

The first thing you need to do is tell Blogger to let WordPress access your account. You will be sent back here after providing authorization.”

This importer allows you to import posts and comments from your Blogger account into your WordPress blog.To use this importer, you must have a Google account and an upgraded (New, was Beta) blog hosted on blogspot.com or a custom domain (not FTP).

f) You will find now the authorize button. Click on that button and this option asks Blogger to grant authorization and permit WordPress to access your account.

g) Click on Grant Access Button and sign in to your Blogger account.h) When you grant access it will import all your Blogger's posts and transferred to WordPress account blog.

3. Changing the URL (ATTENTION required in this step) :

The main issue here is that the images hosted on blogspot blog cannot be imported on WordPress blog. So to do this:

a) Login to your WordPress Admin Panel and go to Settings.

b) After clicking on “Settings Option”, it will display a set of options. In this options list you have to click only on “Permalinks”

c) When you select Permalinks Option you will see number of sub-options. In this list you have to select “Custom” and then type the following line
/%year%/%monthnum%/%postname%.html
d) In this step we match the post structure of your Blogger blog

e) It basically minimizes the number of broken links and redirects.

f) Now go to Blogger account blog back. Click on settings.

g) Under Settings select Basic -> Publishing and click on the Blog Address -> Edit -> Advanced settings.

h) Now in the domain field, type your new domain, i.e., http://www.yourblog.com and save it.

i) It will transfer the links automatically to your own domain.

j) In Blogger blog, go to Layout

k) Now click on the option “Edit HTML”. Add the following code anywhere after section:
<meta content='0; url=http://YOURNEWURL.com/' http-equiv='refresh'/>
l) It will send the visitors to your blog homepage directly i.e. to your new URL.

m) This is considered as one of the safest methods of redirection in Search Engine Optimization

n) Finally the above change in URL structure shows a warning page that you are taking all to another domain. Continue here.

IMPORTANT : After successful migration, remember to delete your old blog from Blogger to prevent from content duplicity.

Below is a  step by step video from Amit Agarwal of Labnol. This video will guide you to move from Blogger to WordPress platform.


In this process you can also use 301 Redirects to Fix your Broken links. Here you have done migration successfully from Blogger to WordPress blogs. Now you can give your blog a wonderful and catchy look. Let us know if you face any issue while doing this process and also share your experience.

Saturday

How To Display Blog Title After Post Title For Blogger / Blogspot

Posted By: Arin Dey - September 17, 2011
If you search your website links in search engines then you will find that your blog title appears first followed by blog post title along with with other blogs. Now imagine a situation where you want to show only the blog post title and not blog title? In WordPress we can change title positions via All in One SEO settings very easily. But a lot of bloggers experience the issue while implementing in Blogger/Blogspot blogs. It requires a little bit of HTML code modification. Here, I will explain the way how to do that.

You can choose any of the 2 options :
  • Blog Post Title + Blog Title 
  • Only Blog Post Title 
Here we go with step by step process: (Assuming that you are using new blogger interface)

1. Login to Blogger account.
2. In Dashboard select the blog and click on the Template button.
3. Click on Edit HTML. Proceed to edit.
              
How To Display Blog Title After Post Title For Blogger

4. Now search for this tag.
<title><data:blog.pageTitle/></title>
5. If you want to show only Blog Post Title then replace it with following code:
<b:if cond='data:blog.pageType == "item"'>
<title><data:blog.pageName/> | <data:blog.title/></title>
<b:else/>
<title><data:blog.pageTitle/></title>
</b:if>
For Blog Post Title followed by Blog Title option, replace the same tag with following code:
<b:if cond='data:blog.pageType == "item"'>
<title><data:blog.pageName/> | <data:blog.title/></title>
<b:else/>
<title><data:blog.pageTitle/> | <data:blog.title/></title>
</b:if>
That's all. Isn't that simple? You can search your posts picking randomly from your blog in search engines. There you will find that your post title is appearing before your blog title.

Monday

How To Add Floating Social Media Sharing Buttons To Blogger

Posted By: Arin Dey - September 12, 2011
Some of our readers asked us about some widget on how to add a floating bar of social media buttons to a Blogger/Blogspot blog. So we scripted the widget, hence you don’t have to go into your template HTML to install (or remove) it. We have done it so simple, where you can only copy the whole code and paste into a HTML/Javascript gadget.
How To Add Floating Social Media Sharing Buttons To Blogger

Here in this How-to add social media sharing buttons guide we have included Facebook Share, Retweet, StumbleUpon, Digg This and Google +1 (plus one) buttons in the left bar. Each of the share button comes with a a live counter. Here depending upon the f-likes, re-tweets and other likes the counter will increase in number.

How to add the buttons

1. Login to your Blogger dashboard.
2. Go to Layout > Page Elements.
3. Now Click on Add A Gadget.
4. In Add A Gadget window, select HTML/Javascript .

5. Copy the code below and paste it inside the content box.
<!-- Floating Social Share Buttons-->
<style type="text/css">
#pageshare {position:fixed; bottom:20%; left:50px; float:left; border-radius:5px;-moz-border-radius:5px;-webkit-border-radius:5px;background-color:#fff;padding:0 0 2px 0;z-index:10;}
#pageshare .sbutton {float:left;clear:both;margin:5px 5px 0 5px;}
.fb_share_count_top {width:48px !important;}
.fb_share_count_top, .fb_share_count_inner {-moz-border-radius:3px;-webkit-border-radius:3px;}
.FBConnectButton_Small, .FBConnectButton_RTL_Small {width:49px !important; -moz-border-radius:3px;/*bs-fsmsb*/-webkit-border-radius:3px;}
.FBConnectButton_Small .FBConnectButton_Text {padding:2px 2px 3px !important;-moz-border-radius:3px;-webkit-border-radius:3px;font-size:8px;}
</style>
<div id='pageshare' title="Get this from Poketors.com">
<div class='sbutton' id='fb'>
<a name="fb_share" type="box_count" href="http://www.facebook.com/sharer.php">Share</a><script src="http://static.ak.fbcdn.net/connect.php/js/FB.Share" type="text/javascript"></script>
</div>
<div class='sbutton' id='rt'>

<script src="http://tweetmeme.com/i/scripts/button.js" type='text/javascript'></script>
</div>
<div class='sbutton' id='su'>
<script src="http://www.stumbleupon.com/hostedbadge.php?s=5"></script>
</div>
<div class='sbutton' id='digg' style='margin-left:3px;width:48px'>
<script src='http://widgets.digg.com/buttons.js' type='text/javascript'></script>
<a class="DiggThisButton DiggMedium"></a>
</div>
<script type="text/javascript" src="http://ajax.googleapis.com/ajax/libs/jquery/1.3.2/jquery.min.js"></script>
<script type="text/javascript" src="http://delicious-button.googlecode.com/files/jquery.delicious-button-1.0.min.js"></script>
<div class='sbutton' id='gplusone'>
<script type="text/javascript" src="https://apis.google.com/js/plusone.js"></script>
<g:plusone size="tall"></g:plusone>
</div>
</div>
<!-- End of Floating shares -->
6. After copying, save the gadget.
7. Now drag the gadget and reposition it under Blog Posts gadget.
8. Click Save arrangement button on upper right corner.

How to customize the buttons

1.Vertical alignment
You need to change the value of bottom in code line 3. That code will position the button relative to the bottom of your browser window. In case you want to fix the distance even when window is resized, specify the value in px (pixels) instead of %.

2. Horizontal alignment
Change the value of margin-left (search for the code). Now here if we enter 'negative value' which will push the button to the left of the main blog column, in case we enter 'positive value' it pushes it to the right.
So, to position the button relative to the left or right edge of browser window, replace the margin-left with left (as in left:10px;) or right (as in right:10px;) respectively.

3. In case, replacing and removing buttons
You can replace existing buttons with your own. Each button is represented by this code:
<div class='sbutton'>
BUTTON CODE
</div>
While replacing the button, simply replace the button code with the new code. To remove the button, delete the whole div.

If you face any issue displaying your Google +1 button, despite other buttons appear successfully, try this :
  • Go to Template > Edit HTML and find this line:
<body expr:class='"loading" + data:blog.mobileClass'>
or
<body>
  • Now copy the code in step # 5 and paste it right below the line.
  • Click preview before saving.
We have done installing the widget for floating social media share buttons bar.

Friday

How To Add Multiple Authors in Blogger / Blogspot

Posted By: Arin Dey - September 09, 2011
Most of the bloggers usually prefers blogger.com for their first blog as it is easy to configure, drag drop layout pattern, easy HTML edit option and quick posting facilities. And over all along with the admin author it allows to create multiple author with their individual blogs or may be shared blog with admin. So for the newbies I will show how can you add the authors and create and manage separate blogs.

How To Add Multiple Authors in Blogger

Here we go with the following easy setup (Assuming the new blogger interface) :

1. Login to your Blogger Account.

2. Now you are at Blog list. 

3. Click on the particular Blog. And select Settings.

4. Under the Settings, click Permissions -> Blog Authors 

5. You can see here that there are 1 Admin and 2 Authors (Author1 & Poketors)

6. Now click on +Add authors (as shown in the picture below)

multiple author option in blogger

7. Then it will popup for entering an e-mail address of the new author you want to invite to connect to your blog. 

Now you have invited your Author and Blogger sends an e-mail to the e-mail ID where it asks the person to become a contributor to your blog and gives him the link for registration. (See in the picture above -> 1 open invitations)

8. The registration form will ask to click the link to join the admin blog account. 

To register you have to put your gmail account (Username and Password) or Create your new gmail account now. Then fill the information and click Accept Invitation. 

9. If the new Author has accepted your invitation, at the Permission settings under the Blog Authors section (like the above picture) you can have that the Author name with email address. Here you have successfully added an Author. 

Here you can give Admin permission by clicking on the Author tab drop down menu (by selecting Admin)

Hope this has helped you adding new author.

Monday

How To Place AdSense Ad Below Post Title & Post Body

Posted By: Arin Dey - September 05, 2011
One of the most popular Ad Network on the web is Google AdSense. Most of the Blogger users use it. There is no specific way or trick where should we put the Ads for maximum exposure. Bloggers are putting the ads in places around the header or above the posts or below the post titles. From Blogger Layout view you can easily add AdSense in your sidebar as a gadget. Since Blogger doesn't allow us to place the ads below post titles (see Google AdSense Ad Placement). But placing Ad units below post titles has proven to be one of the most successful money making place in a web page. So let’s go for this AdSense setup and follow the below how-to steps to add your AdSense ads below post titles or below post.
google adsense
Note: Assuming that we are using the new AdSense interface.

Here we go with the steps:

Before we start take a backup of your existing Template before making any changes.

1. Log in to your Google Adsense at https://www.google.com/adsense/
2. Click on My ads tab and open Ad units from the left side by expanding Content link.
3. Now Click new ad unit to create a new ad.
4. Select the size, type and color of your ad. For best results chose either 336x280 large or 300x250 medium rectangle.

adsense code setup

5. According to Blog topic give some memorable name.
6. Fill up the required information, click save and get code button at the bottom of the page.
7. A pop-up window will appear with the ad code. Copy that code.

collect adsense code

8. Now it’s time to paste the code in blogger page but before pasting the ad code in Blogger, we must make it compatible with Blogger format.

Go to Hacktrix (http://www.hacktrix.com/adsense-code-converter/) and paste the ad code in the top box and convert (parse) it. You'll find the converted (parsed) ad code in the bottom box there. Copy the converted ad code.
9. Now open your Blogger account and go to Template (as per new Blogger interface) then Edit HTML tab and check Expand Widget Templates option.

10. Press Ctrl + F to find
<data:post.body/>
               You'll see some code like the following:
<div class='post-body entry-content'><data:post.body/><div style='clear: both;'/></div>
11. Now paste the converted (parsed) ad code just before the above code (for below post title) and paste beneath that if you want them to appear below post body. The result would look something like this:
<script type="text/javascript"><!--
google_ad_client = "ca-pub-xxxxxxxxxxxxxxx";
/* Advertisement */
google_ad_slot = "xxxxxxxxxx";
google_ad_width = 336;
google_ad_height = 280;
//-->
</script>
<script type="text/javascript"
src="http://pagead2.googlesyndication.com/pagead/show_ads.js">
</script>
<div class='post-body entry-content'>
<data:post.body/>
<div style='clear: both;'/> <!-- clear for photos floats -->
</div>
12. Click the Preview button to see the preview page. You might not see ads below post titles instantly because sometimes AdSense ads take some time to display. 

13. Save your template by clicking the Save template button. 

14. See your webpage. It’s ready with AdSense Ads.

Note : Make Ads Appear Only on Post Pages

Viewers don't like to see more ads on a single page. So, we can hide the ads under post titles on main page. These ads will appear only when users will click the post title and go to the post page. Follow the steps above but after step 8 you have the converted ad code. Ad some more code in that converted code so that it should look like below:

<b:if cond='data:blog.pageType == "item"'><script type="text/javascript"><!--
google_ad_client = "ca-pub-xxxxxxxxxxxxxxx";
/* Advertisement */
google_ad_slot = "xxxxxxxxxx";
google_ad_width = 300;
google_ad_height = 250;
//-->
</script>
<script type="text/javascript"
src="http://pagead2.googlesyndication.com/pagead/show_ads.js">
</script></b:if>
Just an addition to the previous code by adding “if” condition to make the ads appear only on post pages. After that, follow the rest of the steps.

Please review the policies of Google AdSense before using any code on your blogs. They keep changing their TOS.

How To Add Related Posts Widget to Blogger / Blogspot

Posted By: Arin Dey - September 05, 2011
This post will help you to add related posts widget to your blogger posts to display links of related topics/posts below each of your blog posts. This is a nice tip for which a lot of  your site viewers will stay on your site to read some other topics too related to the present topic. This trick will generate interest to the viewers to keep reading your blog.
How To Add Related Posts Widget to Blogger

Note : Assuming you are using new Blogger interface.

Here we go with process:

1. Go to Template > Edit HTML in your Blogger Dashboard.

2. Take a back up of your existing Template before making any changes. 

3. Check the "Expand Widget Templates" box. 

4. Search for the tag.

5. Add the following code just before the tag.
<style> #related-posts { float : left; width : 540px; margin-top:20px; margin-left : 5px; margin-bottom:20px; font : 11px Verdana; margin-bottom:10px; } #related-posts .widget { list-style-type : none; margin : 5px 0 5px 0; padding : 0; } #related-posts .widget h2, #related-posts h2 { font-size : 20px; font-weight : normal; margin : 5px 7px 0; padding : 0 0 5px; } #related-posts a { text-decoration : none; } #related-posts a:hover { text-decoration : none; } #related-posts ul { border : medium none; margin : 10px; padding : 0; } #related-posts ul li { display : block; background : url("http://lh3.ggpht.com/_cNpXRtRph18/S76dASm3WGI/AAAAAAAAEJg/AVmw4HhRdsk/rss.png") no-repeat 0 0; margin : 0; padding-top : 0; padding-right : 0; padding-bottom : 1px; padding-left : 21px; margin-bottom : 5px; line-height : 2em; border-bottom:1px dotted #cccccc; } </style> <script src='http://theblogtemplates.com/scripts/Related_posts_hack.js' type='text/javascript'/>
Now search for <data:post.body/>. In some of the templates this code may look like this
<div class='post-body>
6. Now search for <data:post.body/>. In some of the templates this code may look like this
<div class='post-body>
or
<data:post.body/>
7. Add the following code just below the code you just searched for.
<b:if cond='data:blog.pageType == "item"'>
<div id="related-posts">
<font face='Arial' size='3'><b>Related Posts : </b></font><font color='#FFFFFF'><b:loop values='data:post.labels' var='label'><data:label.name/><b:if cond='data:label.isLast != "true"'>,</b:if><b:if cond='data:blog.pageType == "item"'>
<script expr:src='"/feeds/posts/default/-/" + data:label.name + "?alt=json-in-script&callback=related_results_labels&max-results=5"' type='text/javascript'/></b:if></b:loop> </font>
<script type='text/javascript'> removeRelatedDuplicates(); printRelatedLabels();
</script>
</div></b:if>
8. Now save your Template and we've done.

You can CUSTOMIZE in order to change the number of maximum related posts being displayed for each label, search for the code below (within the code given in step 7) and change the number "5" to any desired number.
max-results=5           
So we have done adding a widget for related posts.

Saturday

About Blogger.com

Posted By: Arin Dey - August 20, 2011
A lot of blogging platforms are available over net for writing your contents. Among all the free blogging platforms, blogger.com and wordpress.com are the most popular. Most of the beginner bloggers start their blog on blogger/blogspot. Lets know how Blogger got introduced.

In words from Blogger.com :
Blogger was started by a tiny company in San Francisco called Pyra Labs in August of 1999. This was in the midst of the dot-com boom. But we weren't exactly a VC-funded, party-throwing, foosball-in-the-lobby-playing, free-beer-drinking outfit. (Unless it was other people's free beer.)We were three friends, funded by doing annoying contract web projects for big companies, trying to make our own grand entrance onto the Internet landscape. What we were originally trying to do doesn't matter so much now. But while doing it, we created Blogger, more or less on a whim, and thought — Hmmm... that's kinda interesting.Blogger took off, in a small way, and eventually a bigger way, over a couple years. We raised a little money (but stayed small). And then the bust happened, and we ran out of money, and our fun little journey got less fun. We narrowly survived, not all in one piece, but kept the service going the whole time (most days) and started building it back up.Things were going well again in 2002. We had hundreds of thousands of users, though still just a few people. And then something no one expected happened: Google wanted to buy us. Yes, that Google. - Blogger.com
About Blogger.com

Wikipedia explains as "Generally, the blogs are hosted by Google at a sub-domain of blogspot.com. Up until May 1, 2010 Blogger allowed users to publish blogs on other hosts, via FTP. All such blogs had (or still have) to be moved to Google's own servers, with domains other than blogspot.com allowed via Custom URLs. In July of 2011 a news outlet announced that Google intends to change the name of the service from "Blogger" to "Google Blogs," as part of a larger plan to re-brand or retire all non-Google brands in its portfolio of products and services."
                       
             Integration :

  • The Google Toolbar has a feature called "BlogThis!" which allows toolbar users with Blogger accounts to post links directly to their blogs. 
  • "Blogger for Word" is an add-in for Microsoft Word which allows users to save a Microsoft Word Document directly to a Blogger blog, as well as edit their posts both on- and offline. As of January 2007, Google says "Blogger for Word is not currently compatible with the new version of Blogger", and they state no decision has been made about supporting it with the new Blogger. However, Microsoft Office 2007 adds native support for a variety of blogging systems, including Blogger. 
  • Blogger supports Google's AdSense service as a way of generating revenue from running a blog. 
  • Blogger also started integration of Amazon Associates as a service to generate revenue. 
  • Blogger offers multiple author support, making it possible to establish group blogs. 
  • Blogger offers a template editing feature, which allows users to customize the Blogger template. 
  • Google Docs has direct publishing integration to Blogger. 
  • Windows Live Writer, a standalone app of the Windows Live suite, publishes directly to Blogger. 
  • In a version of the service called Blogger in Draft, new features are tested before being released to all users. New features are discussed in the service's.

    Limitations :

  • Blogger has imposed the following limitations on content storage and bandwidth, per user account: 
  • Number of blogs = Unlimited 
  • Size of pages = Individual pages (the main page of a blog or archive pages) are limited to 1 MB 
  • Number of labels = 5,000 unique labels per blog, 20 unique labels per post 
  • Number of pictures (hyperlinked from user's Picasa Web Album) = Up to 1 GB of free storage 
  • Size of pictures = If posted via Blogger Mobile, limited 250 KB per picture; posted pictures are scaled to 800px[citation needed] 
  • Team members (those that can write to a blog) = 100 
  • Stand-Alone Page = Limited to 10 stand-alone pages
By offering a free service blogger.com has received a lot of appreciation and it keeps growing in its space with introducing various inbuilt tools and options which make blogging easy.

Copyright © 2010-2023 Poketors | The content of this website is copyrighted and may not be reproduced on other websites.| Email us at : admin@poketors.com.